New Digital Artworks and Digital Tips!
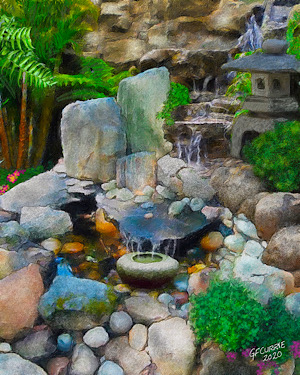
Stone Pools & Waterfall — This new digital painting was created in Procreate using 7 different pictures layered together (rocks, cairn, ferns, background shale etc). I used a lot of brushes from Timmy’s Textures (the Rockyyy, Galactic Haze, and the Wet Moon Sand brushes). This was about an 9 hour project, used reference pictures (for ideas) on Pinterest. The brushes I have purchased from Visual Timmy (specifically the Creator XL Bundle) have allowed me to step up my creativity and quality.
DIGITAL PAINTING TIPS — So a number of people have asked how I paint my digital garden art paintings. Today I thought I would share some of the process. Most of these techniques cover 99% of my paintings (and how they are painted).
Before I start, as many of you know, I paint on my iPad Pro 12.9” using an Apple Pencil. I create my art using Procreate 5X but with some paintings, I will mockup ideas in Adobe Photoshop 2020 (part of my Creative Cloud Membership).
The brushes used are made by myself in the Procreate Brush Editor. About 10-15% of my brushes are created by myself. The other 85% are purchased from various brush creators. Lately I have used a lot of brushes from VisualTimmy. I also buy brushes from Art Station and Gumroad. I will list my brushes in a future post.
Step 1 — I research most of my painting and add ideas and references to my Pinterest folders. Some artworks are inspired by pictures I have taken, some are created by combining multiple photos and others are based on ideas in my head.
Step 2 — Determining the size of the art. I start out with a 4000 to 6000 pixel image at a 300 dpi level (DPI =Dots Per Inch). This allows me to create art I can print at 11 x 17” to 16 x 24” size for poster prints.
Step 3 — Basics – I will look at a scene and determine the angle of the sun, the colour choices and palettes, what format I will create (portrait or landscape), the central theme or focus. I also try to watch for visual travel through a painting. Example; were do I want to lead the viewer, what secret items do I want to hide from the viewer, what impact does perspective have. I will rough out ideas on what type of textures I might plan on using.
Step 4 — Blocking out solid areas on colour. Here I will block out blocks of colour representing bushes, sides of buildings, the sky in the picture. I will sketch out dark tones, mid tones and highlights (like sun and intense lighting).
Step 5 — I then start to block in leaves and foliage, stone paths, building walls and blocks. I don’t detail these quite yet but I want to get a sense of randomness, especially creating gardens and plant leaf structures.
Step 6 — With my garden art and flowers and shrubs, I start looking at colours and focus on complimentary colours
Step 7 — With Garden Art, nothing in nature is perfect. Leaves get stained and have many uniques textures, stems and stalks get broken, grass and foliage grows at different lengths. Rocks vary the most and come covered in cracks, rock types (slate, granite, rounded boulders in streams. Odd shapes are common. If its natural, its affected by rain, wind, winter, run off water damage and hundreds of other effects.
Step 8 — As the digital painting progresses, I start to add more detail working on small areas (about 1/20th of the image). Then I let. The painting sit overnight or in some cases for weeks or months.
Step 9 — I experiment with new and old techniques that I learn from other artists and youtube videos. Again, I want the painting to be unique. I focus alot on making rocks look real, fur looked correct and really making shadows look like they make sense.
Step 10 — During the painting process I flip the canvas left to right and also flip upside down. This gives me a unique look at flowers and foliage. Does the picture makes sense. I might create 3-4 versions of the picture so I can experiment. If my iPad or software crashes or dies (it can happen), I don’t lose hours of work. Lastly, I spend time backing up versions of the original file, in Procreate, with layers intact. A copy goes to my iCloud account and copies to my Google and Dropbox accounts.
To complete this snapshot, for every hour I spend painting, I study art and other paintings for at least 20% of my time. So for example, if I spend 10 hours painting a new creation, I have probably spent 2.5 hours learning how to paint rocks, leaves, choose colour palettes and other specialized techniques. I rarely paint moore than 2 hours at a time as my back hurts, my vision is not great.
In the future, I plan to show people examples of my techniques and tips, building some courses on how to paint using Procreate and publish videos and graphics. Enjoy!